I just got my first chess tournament win

I just got my first chess tournament win! Granted, it was a lowkey 8-player event with no prize pool, but I still played some tough opponents. My two big goals when I first started taking chess seriously were to 1. get National Master, and 2. win a tournament. Even though it was not the strongest event, I can only beat who’s in front of me, so I will totally count this as having accomplished goal number 2.

The tournament format was a one-day, four-game Swiss system with a time control of G/60 delay 10 (for non-chess savvy readers, that is sixty minutes to make all of your moves). I went in with a USCF rating of 1551. In the first game, I played an unrated player at his first event, who hadn’t played at a club or played online before, but (I am told) was very good against his family members. He played extremely quickly, often making his moves within ten seconds, and I soon won material and checkmated him. He finished with 59 minutes still left on his clock. I think he realized at this event that tournament play is a whole different beast than playing against your cousin!

In my second game, I played an Australian expat not much older than myself. This was just his second USCF-rated event, since he had only played chess as a child before he moved to the States twelve years ago. His provisional rating after his first USCF tournament a month ago was 1733. I had the white pieces against him, and I met his Sicilian Dragon with the critical Yugoslov attack (see here for a Lichess analysis of the game). Judging by his move times, he was out of book around the same time that I was after 9…d5. I could not remember theory, but I stumbled into playing a reasonable engine-approved line, and I was able to get my kingside attack in much more quickly than he was able to generate queenside counterplay. A couple of slow moves from him allowed me to get in the typical g2-g4, h2-h4-h5 pawn storm in, and once his king was ripped open, the game was more or less over. My opponent resigned on move 34 after trying to fight on for a little bit.

The victory put me at 2-0 going into the third round, which was against an opponent rated 1592. This time, I had the black pieces, and my opponent played the King’s Gambit (see here for Lichess analysis). I played the Declined variation with 2…Bc5, which I have found to be a highly reliable way to steer the game into a calm position, one which resembles a more typical Double King Pawn opening than a rip-roaring King’s Gambit. When you play the King’s Gambit Declined, you leave the pawn on e5 apparently undefended for several moves, but the pawn is defended tactically, so trying to bank the pawn and win material is a very bad idea. I have defeated many greedy players online with this trap, but I was very surprised when my opponent (after thinking about whether he should take the pawn for 10-15 minutes) made the same game-losing blunder! After my reply, 6…Qd4, I am guaranteed to win a piece and gain a decisive advantage. My opponent played on for two more moves, but resigned after move 8 when he realized how hopeless the position was. My quickest over-the-board win to date!

Deciding how to reply to the Berlin Defense on my fourth game

The final game was against an unrated player. At 3-0, I was guaranteed to at least tie for first place in the tournament, but the result of this game would determine whether I shared the title with my opponent or kept it all to myself. I had the white pieces and played a Ruy Lopez (see here for Lichess analysis). My opponent responded with the Berlin Defense, which I met with the move 4.d3 to avoid the slog of a Berlin endgame. An early blunder left me with a bad position for much of the middlegame with major weak squares around my king. However, I was able to land a very nice tactic (19.Bc4 followed by 20.Ne7+) to swing the game back in my favor. I blundered badly once again, and the game ended in a chaotic position with both kings in danger and active major pieces flying everywhere- luckily, my opponent miscalculated at a critical moment, and I was able to swindle the game with a surprising checkmate. Outside of the two mistakes he made, my opponent played extremely well, and certainly gave me the toughest game of the tournament.

The crosstable for the tournament

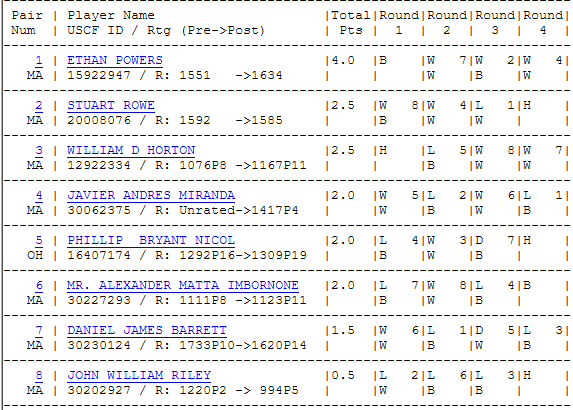
I was very happy to win the tournament with a perfect score of 4/4, even if it was not the strongest event. I am especially proud of myself for staying calm and fighting back during the last game- I can be prone to tilt when I have a bad position. Although there was no prize money or trophy for this event, my rating went up by a substantial 83 points. And, as always, it’s a lot of fun just to be at events, play exciting games, meet interesting people, and talk lots of chess!

Thanks for reading, and thank you to the Boylston Chess Club for organizing the event.

New lab, recent prints

Hi everyone! Today I’m sharing my new dedicated 3D printing space, as well as a few recent prints I’ve made.

I had big plans going into my first summer break as a teacher, most of which went down the drain when I broke my distal fibula (ankle bone) right before the fourth of July playing flag football. However, when one door closes, another opens, and so I used my newfound down time to start a 3D printing lab.

Left to right: the Geeetech A20T, the Creality CR-6 SE, and the Creality Ender-3 Pro

Building the Lab

First, I consolidated my three printers from various locations around the house (bedroom, porch, dining room…) to a repurposed slot-car table in the basement. This is the perfect location, because the printers can run 24/7 without bothering everyone with the noise. Next, I furnished the lab with new tool drawers and a mini trash can. I also bought a big clear plastic table mat to go under everything. It’s normally used to keep dining tables clean and scratch-free, but I figured it would be the perfect work surface, since it’s very easy to clean the endless amounts of filament cuts and string that tend to pile up.

3D printed spool holders that allow the roll to spin freely during printing

The three printers that are in the lab are: an Ender 3 Pro (about $250 at the time of purchase- cheap, but a very reliable workhorse printer), a Creality CR-6 SE ($400, has auto bed leveling, a glass bed, and prints very quietly- very refined compared to the Ender), and a Geeetech A20T ($440, can print up to three colors on a single part, has a massive build volume, but is very noisy and very finicky). I gravitate towards the Ender and CR-6 for simple single-color parts, whereas the A20T I use almost exclusively for multicolor prints. All three printers have been very busy with various projects for the past few weeks! I did purchase a resin printer a while back, but the safety and ventilation requirements meant that it was impractical to have in the house, so I ended up giving it to a student.

Future Additions

While I am mostly content with the state of the lab for now, there are a few additions that I would love to make at some point:

  • A better way to hold and organize unloaded filament- maybe a rack or spool system- but right now, I have many rolls just lying around on the table.
  • A display case to show off some of the nicer prints I’ve made, these are also just scattered around the area for now (friends or family reading this- GREAT holiday gift idea, wink wink).
  • Filament dryers or dehumidifiers to keep filament from collecting moisture (if your filament absorbs too much moisture from the air, it can negatively affect print quality)
  • Better cable management
  • Some kind of camera/IOT(?) system to feed to my desktop so I can check on prints remotely without going downstairs. Totally unnecessary, but what is it to be human, if not to totally conquer one’s environment with completely over-the-top ways to save minuscule amounts of time and effort?

Goals

I have a few goals that drove me to buy so many printers and put together this lab space. First and foremost, 3D printing is very rewarding and a lot of fun, and I really enjoy printing new, interesting stuff as a hobby. I also like to hone my skills and come up with new ideas for my 3D printing classes at IHS. What better way to stay in touch with a fast-changing technical field than to constantly participate in it? Another big justification for my investment is that I am aiming to start a print shop at some point. My problem is that it isn’t obvious at all what I should actually print to sell. Etsy is completely flooded with all of the obvious parts that are easy to print, so simply going to Thingiverse and producing the most popular models is off the table. I wanted to sell custom relief maps (perhaps for a future blog post), but there are several technical limitations with software that make me hesitant to go public. I doubt your average shopper will understand, for example, why I can only print blue lakes that are on the same plane as each other. So, the quest to figure out what to sell continues. For now, though, I am definitely open to commissions, so hit me up!

Recent Prints

Here are some of the prints I’ve made over the past week. I was finally able to dial in some key settings on the A20T, so I have been having a lot of fun with printing in multiple colors.

I also got some blue silk filament from Hatchbox recently, and it is gorgeous! Take a look at the vases below. They were printed so thin that I was shocked that they actually held any water.

3D printed rose in the middle!

I want to get into printing more complex assemblies, so current projects on my radar include a water drop kinetic sculpture and a watch escapement mechanism demonstration.

Thank you for reading. Stay tuned for more print photos and lab updates!

Blue Hills Skyline Trail Hike

A little over a month ago, I went for a hike in the Blue Hills Reservation, south of Boston.

Initially, the group was planning to go to western Mass and hike up a big mountain, but after I complained enough about the long drive time (6+ hours round trip on the same day you hike- booo!) everyone acquiesced to something more local. We settled on this sizable state park down here:

We met in the morning on the eastern side of the reservation, with the basic plan of hiking across to the western side. We did have to think ahead and park a car on the western side beforehand, so that once we finished we could drive back to the parking lot that we had started at, rather than double our hiking time walking back the same path.

Something we learned early on was that this hike was going to take us much longer than any of us anticipated. Going in, I (and I think everyone else) figured that this six-mile hike on relatively flat ground would take us two or three hours, tops. You can imagine our surprise when we had been hiking for an hour or so and came across a map with the “you are here” marker located only a small fraction of the way along the trail. I didn’t think that the map could be right, but, lo and behold, the hike took at least double the time that I thought it would. No big deal- it just wasn’t what I expected!

The hike itself was great. Normally, we hike up mountains with a big sense of progression, lots of elevation gain, and a cool view at the top. I was expecting to be underwhelmed at this hike, which was a flat hike in a straight line in a suburban setting. However, I was very pleasantly surprised at the pacing and the views of the city that the trail provided!

Peeking over the trees to see the Boston skyline- photo credit to Matthew DiBello
The Eliot Memorial Bridge, right next to the observation tower

There were a couple of noteworthy landmarks on the trail, both towards the end of our route. The first was the Great Blue Hill Observation Tower, a stone building made as part of a New Deal program called the CCC. The second was the Blue Hill Weather Observatory, which we could unfortunately not enter due to COVID restrictions.

The weather was extremely variable. What was originally a clear and sunny day quickly turned into a snowstorm. I think that this thinned the crowd out, with the trail getting much less busy as the day went on. Overall, it was a very enjoyable hike, and I would certainly do it again, especially given its proximity to Boston!

Slugmania

I am writing today about something that’s become a bit of a fun fad in my 3D printing classes.

One of the first 3D printing assignments that I have kids do is called “Printing Something From the Internet”, where students find a premade STL file online and print it. It’s an introductory activity to get them some experience with prepping and printing files. They can print anything they can find, so long as it’s school appropriate. So far, I’ve seen Baby Yodas, Bernie Sanders with his infamous mittens, functioning whistles, and more.

However, one student (at this point, I don’t even remember who) printed something for this assignment that really took the cake: one of these adorable little slugs!

What’s special about it is that the designer used what are called “articulated joints” (basically, a pivot/hinge) to connect each section. That means that the slug is able to bend up and down and move from side to side. It printed as one piece, despite having multiple moving parts. Most 3D printed parts are one fixed “block”, so this design is quite a cool novelty!

Since finding out about the slug, several students and I have run with it, printing longer versions, scaled up versions, and multicolor versions.

The feedback loop that this has caused has been quite funny- a student prints a slug, another student (quite often from another section or cohort) sees the slug when it’s finished, thinks it’s neat and decides to print one of their own, then another student comes along and notices that new slug on the buildplate when it’s done, and thus the cycle repeats itself.

As the slugs keep popping up, I’m thinking that there is good potential here for a Robotics fundraiser, where the whole team could take over the 3D printing lab for a week, churn out an army of cute slugs of varying colors and styles, and sell them at next year’s Ipswich Illuminated event. What do you think?

You can find the original slug here and the longer slugs here if you’d like to print one yourself. Thanks for reading!

Back in the gym…

After a long hiatus due to moving and starting a new job, I’ve finally started lifting again. There’s one big difference this time: I’m doing it at home!

I tried to go to the local YMCA last October, but I found that lots of equipment was shut down and there were limited hours due to COVID, which of course resulted in more people crowding around the stations that were still available during the shorter time period the gym was open (I would love to hear an explanation of how their COVID precautions make any sense). I also bumped into some of my students when I tried to go, so the Y is hard off the table for the time being.

Here it is, bench is off to the side. Sorry about the photo quality, my iPhone camera hates lights.

So, I set off on building my own gym. I got a power rack and a cable attachment ($600), a barbell ($250), adjustable dumbells ($160), an adjustable bench ($150), some floor mats ($30), and some molds to make concrete weights for my barbell ($220). The power rack and bench seemed reasonably priced to me, but I think I got gouged and paid “pandemic pricing” on everything else. At about $1400 total, the home gym will pay for itself after a little over two years, assuming I save $50 per month on a gym membership. Not too bad!

It took about a month to put everything together and make enough weights to get started with. I finished building it recently, and I’ve been lifting in it for the past two weeks. I am finding that I can do basically every exercise that I could do in a commercial gym. At the Y, I did almost all free weights anyway. I would occasionally use the assisted dip and pull-up machine or leg extension machine, but that was about the extent of it. The only exercises I really miss in my home gym are standing overhead press and pull-ups, but those are due to the low basement ceiling (me being 6’3″ does not help, either), not any lack of equipment.

I do spend a bit of extra time during workouts shuffling equipment around to get set up for the next exercise. I have to move the bench back and forth, I have to move the barbell in and out, and I have to climb awkwardly around the power rack to get to various weights and attachments, so it’s not a perfect setup, and in an ideal world I would definitely have more space to help alleviate some of these issues. However, I am also saving a lot of time driving to and from the gym, so it probably evens out at the end of the day.

2015 to 2020, about 140lbs to 210. Notice how as I get bigger, the phone gets smaller…

My lifting career is long and rather unimpressive. I have lifted on and off since graduating high school. I have always wanted to get bigger, but my main issue has been consistency. On average, I’ve probably worked out properly for 3 to 4 months out of the year for the past five years. My most recent spurts (like when COVID first hit and I was “working” from home) have been especially fruitful, which I attribute to the increased experience I had compared to when I was first starting out. Over time, I started to figure out things like:

  • I can never successfully commit to a six day routine in any sustained way, if I go for four or five days I will actually be able to complete all workouts week to week
  • Protein shakes don’t need to taste atrocious, I would much rather have a tasty 700 cal/70g protein shake than a monstrous 1400-calorie beast that takes four hours to get through
  • There are a lot of tasty meals that are not chicken and rice that have lots of calories and protein, and are easy to make
  • Forcing myself to work out at set times has never gone well- I need to have the option of working at 3pm or 9pm if I want to

These “realizations” might not apply to you. You may do much better getting up at 5am to work out every single day, or maybe you find that you love getting half your calories for the day in with just one shake. What’s important is that you understand precisely where your own limits are, so that you can set realistic expectations. Obviously I don’t have it all figured out, but I can say that understanding myself has been a big key to more efficient workouts with better results.

I have lost about 20lbs since I moved back home in September, due to the simple fact that I’ve been eating a lot less. Looking at the photos from around August, even though I told myself at the time I was just “bulking”, I definitely did get a little more fat than I needed to, so I did have a few pounds to spare. It’s hard to tell how exactly how much strength I lost during my off period, especially since I’m focusing on different lifts and doing different rep schemes, but however much it is, I’m confident I’ll be back to full strength in no time.

My goals this time around are the same as always- look better, get stronger, feel better. Something that is different is that I put together my own routine, instead of following one that I found online. I am really emphasizing the exercises that I’m weakest in to achieve more well-rounded strength and better posture. For example, I’m aiming to hit abs and upper back three days per week with ten sets on the days “on”, when previously I’ve only gone for six sets at most and two days per week. Here’s the spreadsheet that I made for my routine:

There’s a distinct lack of bench press and other “push” exercises. That’s because I’ve been having a lot of pain in my left arm when I do anything that requires a push motion. I can just about bear it with overhead press (for now), but bench press is off the table. I’m planning on seeing a doctor about it soon, but in the meantime I’m just making the best of it and trying to really hone in on my weak points.

So far, each workout has been taking about an hour and fifteen minutes, which is a lot longer than I was expecting. I intentionally left out a number of reps for each exercise from the spreadsheet. I wanted to give myself some “wiggle room” to try out different things. Maybe I could do pyramid sets one day, maybe some days I could just do straight 5×5, maybe other times I would want to try increasing the reps rather than increasing the weight- basically, I just didn’t want to overcommit.

So, that’s what I’m doing! I’m lifting at home, five days per week, with my own new routine. I will post here periodically with more progress, ramblings, and maybe just some high-protein recipes that I like. Thanks for reading!

Concrete Weights Pt. 2

I started making my third batch of weights this week. I took some pictures so I could show more of the process instead of just the finished product.

First, I had to clean out the molds, since they had just been used. I simply scrubbed with water and IPA (not the beer, but still alcoholic), and they looked much better afterwards:

The ring glued into the mold

Next, I hot glued the metal ring into the mold. The ring is what forms the hole that lets you slide the weight on and off of the barbell. It comes out with the concrete at the end and stays in permanently- the reason for the hot glue is to stop concrete from seeping in and blocking up the hole.

Once the ring was sealed on, it was time to get mixing. Since I had two molds to experiment with, and since I was dissatisfied with the quality of the weights I had previously made, I decided to try a new mixing strategy with each mold. With the larger mold, I would use precisely the water:concrete ratio as recommended on the concrete bag. No matter how it looked, I was going to follow that ratio exactly. With the smaller mold, I would eyeball the ratio as I did with previous batches, but with the new knowledge that I needed a much less soup-y texture in order to make my weights less prone to cracking.

Here is the mix for the larger mold, for which I followed the instructions precisely:

Following the instructions resulted in what seemed to me a very dry, rocky mix. I was skeptical that it would be wet enough, but looking at how my first two batches turned out, what did I know? After mixing in the fiberglass reinforcement provided by Stix and Stone, I poured the mix into the mold until getting the right weight:

I am very doubtful that what you see above is going to somehow cure into a nice smooth surface, but I will find out for sure when I get to school on Monday.

I followed the same process for the smaller mold, but rather than using the prescribed amount of water, I guessed. I was aiming for a texture that lay somewhere in between the soup of my first two batches and the gravelly texture of the mold I had just finished. A big mistake I made with the first batches was that I dumped large quantities of water at once to speed up the mixing process- not good! So, an important change I made this time around is that I added water MUCH more slowly than I did before, so that I could control the texture more precisely. Here’s the resulting pour:

I have a much better feeling about this one than I do with the first. I think the wetter mixture will result in a much smoother surface. Have I finally cracked (no pun intended) the formula for making the perfect weight plate? Or will the quest continue? I will find out on Monday… stay tuned!

Concrete Weights Pt. 1

Left: weights that have been curing for over a week, right: weights that have just been de-molded

After seeing how much it would cost to buy the 25lb and 45lb weight plates for my home gym during the pandemic, I decided to look into ways to make my own. I settled on using concrete molds from the website Stix and Stone. It seemed simple enough- just buy the molds, buy some concrete, mix the concrete with water, put the mix in the mold, wait a couple days, and voila, you’ve got yourself a barbell plate at a fraction of the cost. As it turns out, this plan was not as straightforward as it first appeared.

The main problem is my inexperience with concrete- this is my first time ever mixing or pouring it. I did not understand going in that this would require a level of finesse akin to a baker adding just the right amount of ingredients to make the perfect loaf of bread. For the first two batches of weights, I eyeballed the amount of water, and (though I obviously didn’t realize it at the time) ended up using way too much. I have just read that adding more water means that your concrete will shrink more during the curing process, which makes it much more likely to crack. That explains why my first couple of batches are so prone to crumbling when I touch them.

I also didn’t realize how long this whole process would be. I understood it would take a while for the weights to reach full strength (concrete takes about a week to get to 50% strength, and a month to get to 99% strength, according to Stix and Stone), but I didn’t realize they’d still be so weak and crumble-y when I removed them from the molds. The darker gray weights you see that have just been removed from the mold have more of a clay texture than an actual hardened concrete texture, and handling them without breaking them is nigh impossible. I am not sure how much of that is normal, and how much is because I put way too much water in my concrete mix.

A mold after being used

Overall, I am a little frustrated that the weights are taking so long to cure and that they seem so crumbly and fragile- I thought I’d have what I needed to get started lifting again in a week, but clearly, that’s not going to happen. However, I know I will continue to improve my mixing and pouring technique over the next few batches, so I think everything will turn out okay- it’s just a matter of patience, at this point. Who knew that this would be so tricky?

Mount Greylock

Yesterday, I hiked up Mount Greylock with Matt, Angus, Richard, Connor, and Luca. Greylock is the highest mountain in Massachusetts, standing at a mighty 3,491 feet.

The hike took around four and a half hours round trip. The trail was not too busy, but we did see a few folks on the way and at the summit.

Photo credit: Matthew DiBello

At the summit of the mountain, there’s a big memorial that was originally built to honor World War I veterans (see here for more). I’m sure it looks cool normally, but coming through the trees to see it in the dead of winter during a snowstorm, the structure looked AWESOME. It felt like something out of a video game!

Unfortunately, the summit was very cold and windy, so we didn’t get to hang around for long. Overall, it was a very good hike, and I decided (for now) that I prefer winter hikes to summer hikes, since you don’t get as sweaty and sticky in the colder weather. I just need to buy better gear- winter hiking without waterproof shoes and wearing jeans is not ideal!

Blog Mission Statement

Hi everyone! This is a blog I’m deciding to start on something of a whim. I want this to be a place where I can chronicle my progress towards my own goals. I have wanted to do something like this for a couple of years, but I never got around to it.

I have a few reasons for making this blog:

  • I’d like to hold myself more accountable for finishing the things that I start. Very often I will have a great idea for something, I’ll think about it a lot, I might even order the materials or get started, but I will never follow through, and I’ll leave my idea totally unfinished, thus spending lots of time and reaping zero reward. I’m hoping that by putting my ideas and projects here, I’ll feel more committed to finish them off. I am slightly worried that this might backfire- I did read a study a while ago about how telling people your goals or ideas (“hey everyone, I’m going to lose 20lbs this year!”) gives you the same “dopamine hit” or cognitive reward as actually doing the thing itself does, and therefore makes you less likely to follow through since you’re already been cognitively rewarded. Whether I feel more or less inspired to work on my projects after starting this blog is to be determined
  • I want to somehow catalog all of my projects for my future self- if I need to repeat a project, I can look back on what I did and how I did it, I can see what worked and didn’t work, and I can reflect on my mistakes. Also, if someone else is interested in one of my projects, I can point them here, and hopefully they can get some of the aforementioned benefits, as well!
  • This one is simple: I don’t think I’ve written anything as long as this first blog post since college. I’d like to improve (or at least maintain) my writing skills on my own, now that I’m no longer being forced externally to write long pieces of text!
  • I think it’d be convenient to have one coherent place with a lot of the ongoings of my life, so I can update friends and family on what I’m doing while feeling more fancy and sanctimonious than I would just making a Facebook post 
  • I want to get rich and famous from the millions of people across the world that will read this blog

So far, my categories are Projects, Fitness, Hiking, Chess, and Teaching. I plan to add or remove categories as necessary.

Thanks for reading!